|
 Electronic
Gradebook & Spreadsheets Electronic
Gradebook & Spreadsheets
This
assignment has 2 parts.
In this activity, you will become acquainted with the
teacher's best friend, the electronic grade book. With an
electronic grade book, time consuming tasks of adding and
averaging grades is a thing of the past. The ready-made grade
book program you will be using in our classroom is a demo
version program, available from 1st Class Software.
You will also use the Microsoft Excel spreadsheet program to
custom-design your own electronic grade book.
Part
1: Using a ready-made Gradebook - 1st
Class GradeBook
(Total 6 points)
1st Class GradeBook is one of several
commercially available electronic grading programs. These
programs come with several built in features combining data
bases and spreadsheets. These can be powerful tools for
classroom management with students, parents and
administrators. Many of the more popular programs are
available in both Windows and Mac platforms.
(FYI... 1st Class GradeBook is one of MANY commercially
available gradebooks. 1st Class happens to be one
of the most popular free programs).
- 1st Class GradeBook Assignment:
After downloading and trying out 1st Class GradeBook,
submit a typed list of several functions that you found
useful in the program.
Part 2: Custom grade book
using Microsoft Excel (Total 24 points)
For this part of the
assignment, you will complete and turn in 3 pages:
- Spreadsheet grade book printed in Landscape
view. This may print on several sheets of paper.
(12 points)
- Class title
- Column headings
- Calculations rounded to 1 decimal place
(example: 0.5)
- 10 students
- 5 assignments/tests
- Numerical average for each student based on
a formula
- Numerical average for each assignment/test
based on a formula
- Letter grade for each student based on a
formula
- Spreadsheet grade book showing ALL
formulas used for averages and letter grades
printed in Landscape view. This may print on
several sheets of paper. (6 points)
- Column or bar chart showing students' names and
assignments/tests. (6 points)
|
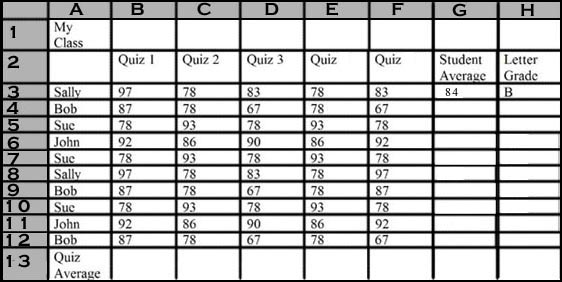
| The following
step-by-step instructions show how to set up a grade
book based on the picture below. Remember
to adjust the cell addresses to match the number of
students in your own grade book.
- Click in A1. Type a class title such as John's
Class using your own name. Click in A1
again. Make any formatting changes you like such
as Bold, different font, different size.
- Click in B2. Type the name of an assignment or
test. Press Tab. Type the name of another
assignment or test. Continue pressing Tab and
typing the names of additional assignments/tests
until you have at least 5.
- Click in A3. Type a student's name. Press Enter.
Type the name of another student. Continue
pressing Enter and typing the students' names
until you have at least 10.
- Type grades for each students' assignment/test
in appropriate cells.
- Click in G3. Calculate the formula for the
Student Average by typing =average(b3:f3)
- Press Enter.
- Repeat the formula for each student. An easy way
to repeat the formula without retyping it, is to
extend the formula from G3 to G7 by dragging the
mouse (skinny plus) from the small black box in G3
to G12.
- Click in B9. Calculate the formula for the
Assignment Average by typing =average(b3:b12)
- Press Enter.
- Repeat the formula for each assignment/test. An
easy way to repeat the formula without retyping
it, is to extend the formula from B13 to F13 by
dragging the mouse (skinny plus) from the small
black box in B13 to F13.
- Click in H3. Calculate the Letter Grade for each
student by typing
=if(g3>90,"A",if(g3>80,"B",if(g3>70,"C",if(g3>60,"D","F"))))
- Press Enter.
- Repeat the formula for each letter grade. An
easy way to repeat the formula without retyping
it, is to extend the formula from H3 to H12 by
dragging the mouse (skinny plus) from the small
black box in H3 to H12.
|
|
|
- To print the gradebook in
the current view:
- Change the direction the page will print by
using the File menu, Page Setup command. Click
on the empty circle next to Landscape. Click OK.
- Print the spreadsheet gradebook in landscape
view. Your spreadsheet may print on more than
one sheet of paper.
|
- To print the gradebook in FORMULA view:
- Click on the Tools menu, Options command. A
dialog box appears.
- Click on the empty box next to Formulas. Click
OK.
- If necessary, change the direction the page
will print by using the File menu, Page Setup
command. Click on the empty circle next to
Landscape. Click OK.
- Print the spreadsheet gradebook showing
formulas in landscape view. Your spreadsheet may
print on more than one sheet of paper.
|
- To create a CHART:
- Click on the Tools menu, Options command. A
dialog box appears.
- Click on the check box next to Formulas to
turn off the display of formulas. Click OK. Your
spreadsheet should now show the results of the
formulas rather than the formulas themselves.
- Point to A2. Drag the mouse (fat plus) from A2
to F12 only. All the cells from A2
to F12 are highlighted.
- Click the Chart Wizard tool. A dialog box
appears.

- Select either a column or bar chart style of
your choice.
- Click the Next button until you get to Step 4
of 4.
- Click the empty circle next to As New Sheet.
- Click Finish. Your chart should be similar to
the example, showing the names of the students
and the names of the assignments/tests.
- Print the chart in landscape view.
|
|
| Additional Tutorial @ http://www.usd.edu/trio/tut/excel/index.html |
|