| In
this example, let’s say that your name is Rocky Bull.
By default, USF has
given you an email address of rbull@mail.usf.edu
Although you may not know it, USF has also given you space on the
internet server as well as a generic web page.
By default, your web page is http://myweb.usf.edu/~rbull |
 |
| Your
web address is made up of two main parts, a host
name and your username.
The default host name for all USF web pages is myweb.usf.edu
You can think of that as the main storage area for all USF student
web sites. So how do you get
to your particular page amongst all of the student web pages?
That is where your username
comes in. Your username is
the first part of your USF email before the @ sign.
(It may also be your Blackboard ID).
In this case, Rocky Bull’s host name is myweb.usf.edu and
his username is rbull To put it all together, Rocky Bull’s USF
home page would be http://myweb.usf.edu/~rbull (That is http://
followed by the host name, followed by a slash, followed by a tilda,
followed by the username).
If you substitute your
own username instead of rbull, you’ll be able to see your USF
page. By default, it will
have some USF information and icons along with a note that you have not
started building your page yet. That
page is your home page and is named “index” by default. ALL web sites have a home page that is titled “index” by
default. “Index” is the
universal name for a first page so that all web browsers know where to go
first.
You can create a new
web page from scratch or you can modify your existing generic page by
downloading it to the computing.
How do you get a web page from your computer onto the Internet (via
your USF server space)?
|
| SSH
(Secure Shell) is the program that allows you to place your web pages
into your USF server space. SSH
is the only program that you can use to upload your files to the USF
server. The program is on the
computers in several lab rooms around campus.
You can also download SSH at home by going to through Academic
Computing. |
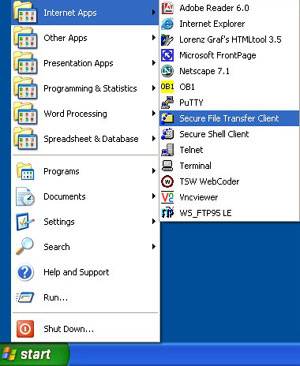 |
| Using
SSH to connect to the USF server
1. Double click
the SSH icon to open the program.
|
 |
| 2. Once the
window opens, click the “quick connect” button.” |
 |
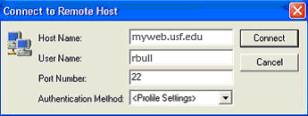
The
SSH Secure File Transfer window will open.
Clicking the “quick connect” button will present the following login
screen.
Recall that your
“Host Name” is “myweb.usf.edu” and your “User Name” is the
first part of your USF email address before the @ sign.
3.
Enter the host name and username.
Leave the last two settings as they are.
4.
Click “connect.” |
 |
| 5.
You may be presented with a screen that asks for a “host key.”
The host key is meant to provide
access to the server, so press “yes.” |
|
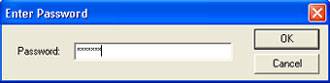
| 6. A pop-up box
will ask for your password. Enter
your Blackboard password and click OK. |
 |
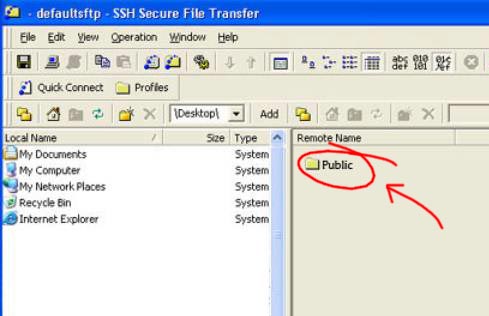
| The SSH Secure File Transfer window will open.
This means that the computer you are sitting at is connected to
your space on the USF server. There
are two sides in the SSH window. The
left side represents the computer that you are sitting at and contains all
of the files on that computer. The
right side represents your space on the server and contains any web pages
or pictures inside a “public” folder.
7.
Everything that you want to appear on your web space must go inside
that “public” folder!
8.
Find your files by browsing in the left side of the window.
|
 |
| 9.
Once you find the files that you want on your web space, drag them
over to the right side of the window into the “public” folder.
That should be it! Your
files should be on the Internet! Open
a separate Internet window and type in your web address to make sure
everything works. |
| 10.
You can click the X in the red box to close the SSH program.
The program will ask you if you want to disconnect.
Click “yes.”
|